How to Photograph Stars.
Photographing the stars is not real hard, but be prepared for some trial and error. It will probably take you 2 or 3 outings before you start getting happy with your results. Shooting in low light causes a lot of issues for both the camera and the photographer, so even with these tips, it will be a learning process.
Conditions:
1. How big is the moon and what time does it rise or set? The moon will wash out the stars if it is too bright. So looking up on a moon rise/set chart is important so you can time when you shoot when the moon either hasn't risen yet, or it's in a very small phase and puts out very minimal light.
2. You don't always need totally clear skies. Often some very spectacular looking star shots can occur when there are some clouds in the sky as they can provide natural windows into the solar system.
3. Since we most often include foregrounds in our star shots, it can be beneficial to start shooting as soon as the sun is set with twilight then providing light to light up the ground layer for you. You may end up using one of these shots to combine later with a layer mask in Photoshop of a star shot taken later. Or sometimes these twilight shots can be really nice all of their own as you will find soft light on the ground layer, and the stars starting to appear in the sky. Even if you can't pick the stars out by your naked eye, the camera can see them.
Technical:
1. Focusing. This is probably the very hardest aspect of shooting stars. Most often we want something in the foreground to compliment the stars. But if the foreground ends up being out of focus and blurry, then it's a distraction and looks poorly. If the stars are out of focus and blurry, it too will come across as badly taken.
So it's best, especially if you are new to shooting the stars, to shoot them in the evening after the sun sets. This will aid you in focusing.
Once the sun has set you will want to open up your Aperture (F stop) to what you will be shooting the stars at. Normally this is wide open. Most lenses range from f2.8 to f4, though there are some lenses that are able to open up to f1.4, f1.8, etc.
What your aperture is set at will affect your focus, so set your lens and then aim to focus a little beyond your foreground objects. Use the technique called Hyper Focal Distance to focus.
2. When shooting stars, most often you want sharp pin point stars. If you want star trails (which can also look great sometimes) that will be discussed later.
3. So you want to use Shutter Speeds that are fast enough to freeze the movement of the stars. This will be dependent on the focal length of the lens you are shooting with. The wider your lens, the longer your shutter speed can be.
A 14mm lens can be shot with a Shutter Speed of 30 seconds and have minimal star movement.
A 20mm lens can use a 25 second Shutter Speed.
A 24mm lens can use a 20 second Shutter Speed.
I discovered this by trial and error, but there is actually a formula to figure it out. It's called the 500 Rule.
Shutter Speed = 500 divided by the Focal Length of your Lens.
There is much discussion about this, so there is no universal consent about this. There are those who perhaps pixel peep a bit too much who will say this formula gives too long of a Shutter Speed. For me, I will say that using this will help you capture the stars that have the perception of being sharp when viewed at a normal viewing distance.
But it's a very personal perception. So you can decide for yourself which Shutter Speed works best for taste. This formula at least gets you in the ball park of sharpness. You can increase or decrease the Shutter Speed according to your own taste.
4. Aperture and ISO. As mentioned in focusing, you will be setting your aperture most often as wide open as it will get. Say for example that's f2.8.
You will then set your ISO to give you a proper exposure. Don't trust your LCD display at night to give you an accurate view. Use the Histogram. Ideally your Histogram will be between 1/3 full on the left to 50%.
After the sun has set and it's starting to get darker, it's not uncommon to start shooting at these settings for example.
f2.8
20 Second Shutter Speed
1600 ISO
As the sky keeps getting darker there will be 2 settings you will adjust. The Shutter Speed can be increased, but not more then 30 Seconds. The ISO can also be increased in increments.
So for example, by the end of the night you could be shooting at:
f2.8
30 Second Shutter Speed
3200 ISO
And if the sky gets really dark, it's not uncommon to have to raise the ISO up to 5000 or even 6400. It is critical to continue to watch your Histogram at this point. It's very easy as it gets darker to think that from the LCD display that your image is bright enough, when in reality it may not be. The Histogram is the friend of every photographer, but especially those that photograph at night.
Not all camera's handle the noise as well as others that comes from raising the ISO. You need to know what your own camera can handle in terms of High ISO before the image just gets so noisy that it's not worth continuing to shoot at that point. But typically within the first 2 hours of sunset most of today's modern DSLR's can handle the High ISO you would be at.
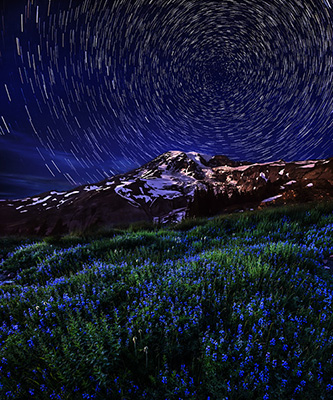
5. Star trails. If you desire to shoot star trails, there are 2 ways to accomplish this.
First, as you are shooting the stars, make sure you have the Long Exposure Noise Reduction turned OFF in your camera, and you simply lock in your remote release and take 20 or 30 (or more) continuous photos.
When you are done, be sure to take a Dark Frame. This is done by taking 1 photo with the same settings you were using but with a lens cap on your lens so no light can leak in. This is done for you to use in Photoshop or other editor to remove hot pixels from your image.
Then in Photoshop you can stack them and change the Blend mode to Lighten, or in a program like StarTrails or StarStax you can load all of the photos into it, and it will stack them for you. I like the Startrails program because it also fills in the very small gaps that occur as your shutter opens and closes between frames when shooting.
Second, you can simply set your camera on Bulb, lock in your remote shutter and take a 10 minute or longer exposure. You will end up with a lower ISO setting and close down your aperture to maybe f5.6 or f8.
I use an App on my IPhone called ExposureCalc. What it will do is calculate what your long exposure setting will be. Lets say you were shooting at f2.8, ISO 3200 and a 30 second exposure to get your properly exposed pinpoint stars. You take those #'s and put them into ExposureCalc and you come up with f5.6 ISO 400 and 16 minutes to properly expose for star trails.
What you will have to decide is how long do you want your star trails to be? So with this program there is a little playing around with the numbers, but you change the output settings of the aperture and ISO until you come up with a length of time for the shot that equals what you desire.
One word of caution. Since the camera sensor is powered by electricity, it heats up. So the longer it is on, the more heat it will generate. That heat can cause the sensor to start causing red blotches (usually) across the image. Some camera's are more sensitive to this then others. The colder it is out at night, the less sensor heat noise will be generated. This is why Astronomers actually have the sensors in their cameras cooled with a coolant. My first Nikon D800 I used in 100 degree heat in the Valley of Fire in Nevada and shot a 20 min exposure with no sensor heat noise generated. But most older DSLR's had issues with shots longer then 5 mins, so it's something you will simply have to test to know what the limits of your camera is.
Additional tips:
1. Make sure to close the shutter on the rear view finder. If not closed or covered with a supplied cover from the camera manufacture most often light will leak in through that can will cause a magenta cast wherever it is leaking in at.
Hopefully this helps you to get out and get some great Star shots of your own!
Photographing the stars is not real hard, but be prepared for some trial and error. It will probably take you 2 or 3 outings before you start getting happy with your results. Shooting in low light causes a lot of issues for both the camera and the photographer, so even with these tips, it will be a learning process.
Conditions:
1. How big is the moon and what time does it rise or set? The moon will wash out the stars if it is too bright. So looking up on a moon rise/set chart is important so you can time when you shoot when the moon either hasn't risen yet, or it's in a very small phase and puts out very minimal light.
2. You don't always need totally clear skies. Often some very spectacular looking star shots can occur when there are some clouds in the sky as they can provide natural windows into the solar system.
3. Since we most often include foregrounds in our star shots, it can be beneficial to start shooting as soon as the sun is set with twilight then providing light to light up the ground layer for you. You may end up using one of these shots to combine later with a layer mask in Photoshop of a star shot taken later. Or sometimes these twilight shots can be really nice all of their own as you will find soft light on the ground layer, and the stars starting to appear in the sky. Even if you can't pick the stars out by your naked eye, the camera can see them.
Technical:
1. Focusing. This is probably the very hardest aspect of shooting stars. Most often we want something in the foreground to compliment the stars. But if the foreground ends up being out of focus and blurry, then it's a distraction and looks poorly. If the stars are out of focus and blurry, it too will come across as badly taken.
So it's best, especially if you are new to shooting the stars, to shoot them in the evening after the sun sets. This will aid you in focusing.
Once the sun has set you will want to open up your Aperture (F stop) to what you will be shooting the stars at. Normally this is wide open. Most lenses range from f2.8 to f4, though there are some lenses that are able to open up to f1.4, f1.8, etc.
What your aperture is set at will affect your focus, so set your lens and then aim to focus a little beyond your foreground objects. Use the technique called Hyper Focal Distance to focus.
2. When shooting stars, most often you want sharp pin point stars. If you want star trails (which can also look great sometimes) that will be discussed later.
3. So you want to use Shutter Speeds that are fast enough to freeze the movement of the stars. This will be dependent on the focal length of the lens you are shooting with. The wider your lens, the longer your shutter speed can be.
A 14mm lens can be shot with a Shutter Speed of 30 seconds and have minimal star movement.
A 20mm lens can use a 25 second Shutter Speed.
A 24mm lens can use a 20 second Shutter Speed.
I discovered this by trial and error, but there is actually a formula to figure it out. It's called the 500 Rule.
Shutter Speed = 500 divided by the Focal Length of your Lens.
There is much discussion about this, so there is no universal consent about this. There are those who perhaps pixel peep a bit too much who will say this formula gives too long of a Shutter Speed. For me, I will say that using this will help you capture the stars that have the perception of being sharp when viewed at a normal viewing distance.
But it's a very personal perception. So you can decide for yourself which Shutter Speed works best for taste. This formula at least gets you in the ball park of sharpness. You can increase or decrease the Shutter Speed according to your own taste.
4. Aperture and ISO. As mentioned in focusing, you will be setting your aperture most often as wide open as it will get. Say for example that's f2.8.
You will then set your ISO to give you a proper exposure. Don't trust your LCD display at night to give you an accurate view. Use the Histogram. Ideally your Histogram will be between 1/3 full on the left to 50%.
After the sun has set and it's starting to get darker, it's not uncommon to start shooting at these settings for example.
f2.8
20 Second Shutter Speed
1600 ISO
As the sky keeps getting darker there will be 2 settings you will adjust. The Shutter Speed can be increased, but not more then 30 Seconds. The ISO can also be increased in increments.
So for example, by the end of the night you could be shooting at:
f2.8
30 Second Shutter Speed
3200 ISO
And if the sky gets really dark, it's not uncommon to have to raise the ISO up to 5000 or even 6400. It is critical to continue to watch your Histogram at this point. It's very easy as it gets darker to think that from the LCD display that your image is bright enough, when in reality it may not be. The Histogram is the friend of every photographer, but especially those that photograph at night.
Not all camera's handle the noise as well as others that comes from raising the ISO. You need to know what your own camera can handle in terms of High ISO before the image just gets so noisy that it's not worth continuing to shoot at that point. But typically within the first 2 hours of sunset most of today's modern DSLR's can handle the High ISO you would be at.
5. Star trails. If you desire to shoot star trails, there are 2 ways to accomplish this.
First, as you are shooting the stars, make sure you have the Long Exposure Noise Reduction turned OFF in your camera, and you simply lock in your remote release and take 20 or 30 (or more) continuous photos.
When you are done, be sure to take a Dark Frame. This is done by taking 1 photo with the same settings you were using but with a lens cap on your lens so no light can leak in. This is done for you to use in Photoshop or other editor to remove hot pixels from your image.
Then in Photoshop you can stack them and change the Blend mode to Lighten, or in a program like StarTrails or StarStax you can load all of the photos into it, and it will stack them for you. I like the Startrails program because it also fills in the very small gaps that occur as your shutter opens and closes between frames when shooting.
Second, you can simply set your camera on Bulb, lock in your remote shutter and take a 10 minute or longer exposure. You will end up with a lower ISO setting and close down your aperture to maybe f5.6 or f8.
I use an App on my IPhone called ExposureCalc. What it will do is calculate what your long exposure setting will be. Lets say you were shooting at f2.8, ISO 3200 and a 30 second exposure to get your properly exposed pinpoint stars. You take those #'s and put them into ExposureCalc and you come up with f5.6 ISO 400 and 16 minutes to properly expose for star trails.
What you will have to decide is how long do you want your star trails to be? So with this program there is a little playing around with the numbers, but you change the output settings of the aperture and ISO until you come up with a length of time for the shot that equals what you desire.
One word of caution. Since the camera sensor is powered by electricity, it heats up. So the longer it is on, the more heat it will generate. That heat can cause the sensor to start causing red blotches (usually) across the image. Some camera's are more sensitive to this then others. The colder it is out at night, the less sensor heat noise will be generated. This is why Astronomers actually have the sensors in their cameras cooled with a coolant. My first Nikon D800 I used in 100 degree heat in the Valley of Fire in Nevada and shot a 20 min exposure with no sensor heat noise generated. But most older DSLR's had issues with shots longer then 5 mins, so it's something you will simply have to test to know what the limits of your camera is.
Additional tips:
1. Make sure to close the shutter on the rear view finder. If not closed or covered with a supplied cover from the camera manufacture most often light will leak in through that can will cause a magenta cast wherever it is leaking in at.
Hopefully this helps you to get out and get some great Star shots of your own!