

Have you ever been out at night shooting the night sky, and the stars are twinkling all over and making the night feel alive? Or you could be in an area where there is more light pollution and the stars are trying to put on a show, but are having difficulties? This is a way to get your stars to show up a bit more in your night sky shots.
One of the Benefits of this process is it does also help to sharpen your stars for you without having to do any sharpening.
First, I want to suggest to make sure in ACR you use the DeHaze slider to help darken the background skies which also helps to get the stars to show up more.
So now start with your image in Photoshop, it doesn't matter which version of Photoshop.
1. Just duplicate the Layers twice in Photoshop.
2. On the top layer draw a selection that goes just below the top of the Butte, but on both sides angle up some to keep the selection in the darker part of the sky. (You are doing that to keep the brighten of the stars to just the darker part of the sky so the lighter part of the sky along the horizon doesn't get brightened) Create a Layer mask from that Selection. (Press Alt and click on the Create Layer Mask Icon)
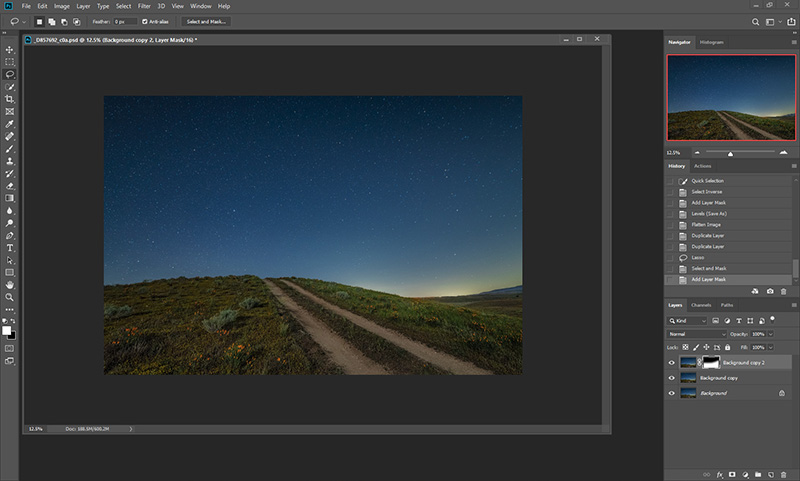
3. Select the Middle Layer. Zoom in closer so you can see the stars, maybe 100%.
4. In the Selection Menu use Color Range and click inside a star. Then adjust the Fuzziness to somewhere around 100, but do it to taste.
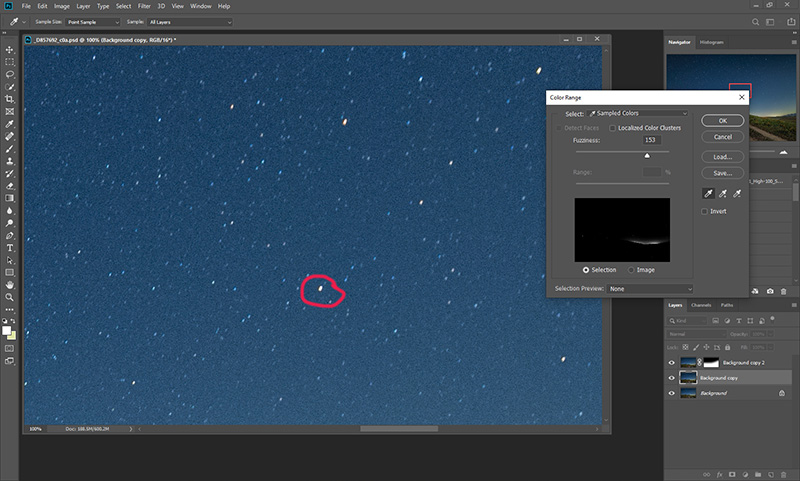
5. In the Selection Menu go to Modify then to Expand, and Expand by 1 Pixel.
6. Press the Alt Key and click on the Make Layer Mask Icon in the Layer tool box to create the Layer Mask for the stars.
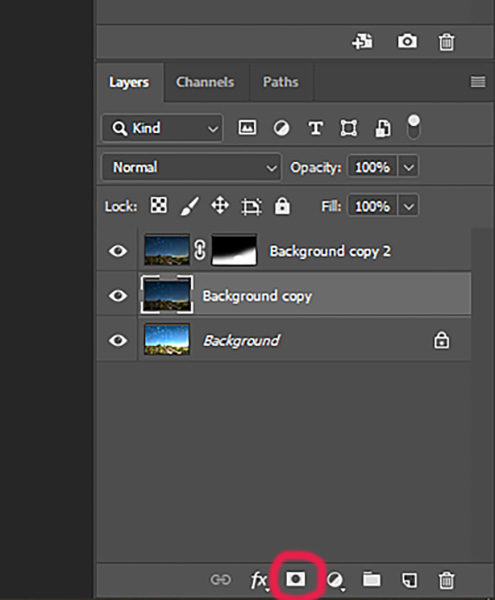
7. Go back to Normal view on the image so you can see the whole image.
8. If your night sky is not dark enough for you, this is a great time with that middle layer to then just go into the Levels or Curve adjustments and bring down the Midtones slightly. Watch your feathered edge at the bottom to make sure the darkening looks natural. Because the stars are in the Layer mask, darkening the middle layer won't darken the stars.
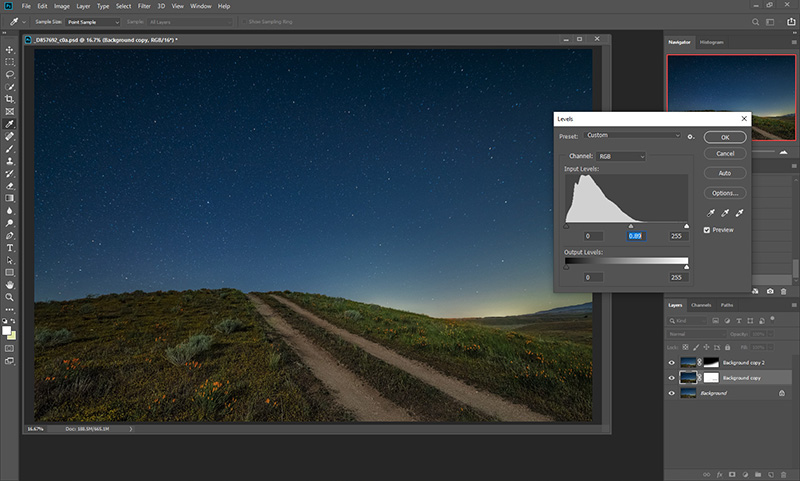
9. Now is when the magic happens! Click on the bottom layer. Go to the Edit menu, select Layers. Now raise up the brightness of that bottom layer until you see the stars a little better.
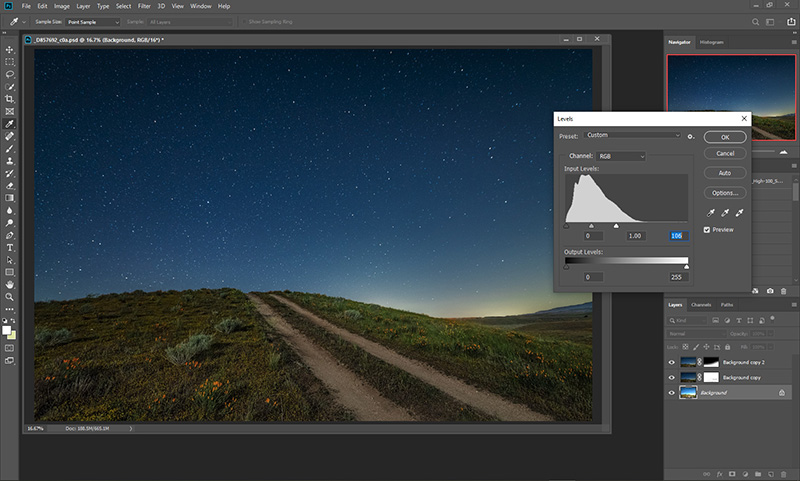
Make sure to keep it natural looking, you can over do it and the stars will be too bright and look fake. The stars can get lost in a photo, where in person it's easy for us to see them. So this is an easy way to help the viewer who wasn't there to also experience the stars.
This whole process once you have done it a time or two shouldn't take more then 2 or 3 minutes.
One of the Benefits of this process is it does also help to sharpen your stars for you without having to do any sharpening.
First, I want to suggest to make sure in ACR you use the DeHaze slider to help darken the background skies which also helps to get the stars to show up more.
So now start with your image in Photoshop, it doesn't matter which version of Photoshop.
1. Just duplicate the Layers twice in Photoshop.
2. On the top layer draw a selection that goes just below the top of the Butte, but on both sides angle up some to keep the selection in the darker part of the sky. (You are doing that to keep the brighten of the stars to just the darker part of the sky so the lighter part of the sky along the horizon doesn't get brightened) Create a Layer mask from that Selection. (Press Alt and click on the Create Layer Mask Icon)
3. Select the Middle Layer. Zoom in closer so you can see the stars, maybe 100%.
4. In the Selection Menu use Color Range and click inside a star. Then adjust the Fuzziness to somewhere around 100, but do it to taste.
5. In the Selection Menu go to Modify then to Expand, and Expand by 1 Pixel.
6. Press the Alt Key and click on the Make Layer Mask Icon in the Layer tool box to create the Layer Mask for the stars.
7. Go back to Normal view on the image so you can see the whole image.
8. If your night sky is not dark enough for you, this is a great time with that middle layer to then just go into the Levels or Curve adjustments and bring down the Midtones slightly. Watch your feathered edge at the bottom to make sure the darkening looks natural. Because the stars are in the Layer mask, darkening the middle layer won't darken the stars.
9. Now is when the magic happens! Click on the bottom layer. Go to the Edit menu, select Layers. Now raise up the brightness of that bottom layer until you see the stars a little better.
Make sure to keep it natural looking, you can over do it and the stars will be too bright and look fake. The stars can get lost in a photo, where in person it's easy for us to see them. So this is an easy way to help the viewer who wasn't there to also experience the stars.
This whole process once you have done it a time or two shouldn't take more then 2 or 3 minutes.
Last edited:

