Replace your ND Filter with Median Blending in Photoshop!
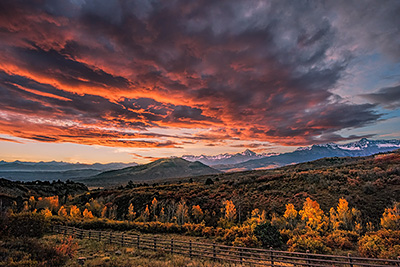
Single Image
17 Images Blended with Median Blend
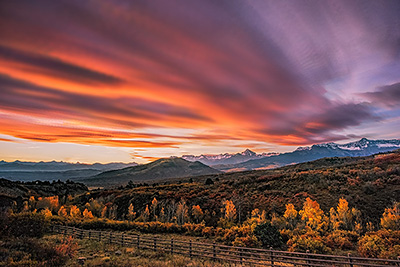
The 17 images here were not even long Shutter Speed shots. I was shooting in Aperture Priority since the light was changing rapidly and I wanted to the camera to compensate. The images range from 1/50th to 1/160th of a second. One of the reasons I was still shooting this fast was because it was a bit breezy, and I wanted to make sure that the leaves were sharp in my shots and not blurry from the wind.
Now this method does not always work, but it works most of the time. If you don't want to change, for sure put on your 10 stop ND if you have it. But sometimes, you may not have the 10 stop ND with you, or maybe the light is just changing too fast, and while you think it the view could look really great with the cloud movement, you aren't positive.
Let me be clear, I do still use my 10 stop ND, it's a valuable tool. But it's great to have options and alternatives so that we can stay flexible when we are out in the field shooting.
Here are the steps:
1. File Menu, Select Script, then select Load Layers
2. Browse to your photos location
3. Select the photos.
You can select a range by clicking on the top file, then hold down the Shift Key and select the last Photo.
Or if the photos are not in order, you can hold down the Ctrl Key while clicking on the Photos you want, this will only select the photos you click on and skip the rest.
4. Check the box: Attempt to Automatically Align Source Images. Even if you shot each photo with your camera on a tripod (You should be), there is still the chance for movement, Photoshop will now make sure all of the photos are lined up, this is very important.
5. Check the box: Create Smart Object after Loading Layers. This will save a step later on as our blending will be done with our photos converted into a Smart Object.
6. Press OK
7. Go to the Layers Menu, and select Smart Objects. Select Stack Mode and then choose Median.
I have also had success with Selecting Mean instead of Median.
If on the Ground layer there are trees, leaves, grasses etc, that because of slight movement now don't look quite right, simply go back to the first image of your stack, use it as the base ground layer, and with a simple layer mask just blend the sky (or water) from the Blended layers into your base layer. Since the base layer is one of the images you used for your stacking and blending, it will seamlessly blend in.
Also as you finish up, you will possibly see some space on the edges where the Alignment you did in the beginning did move some of the images to line them up. Just use the crop tool and crop those edges off.
And there you have it. An alternative to your 10 stop ND!
Single Image
17 Images Blended with Median Blend
The 17 images here were not even long Shutter Speed shots. I was shooting in Aperture Priority since the light was changing rapidly and I wanted to the camera to compensate. The images range from 1/50th to 1/160th of a second. One of the reasons I was still shooting this fast was because it was a bit breezy, and I wanted to make sure that the leaves were sharp in my shots and not blurry from the wind.
Now this method does not always work, but it works most of the time. If you don't want to change, for sure put on your 10 stop ND if you have it. But sometimes, you may not have the 10 stop ND with you, or maybe the light is just changing too fast, and while you think it the view could look really great with the cloud movement, you aren't positive.
Let me be clear, I do still use my 10 stop ND, it's a valuable tool. But it's great to have options and alternatives so that we can stay flexible when we are out in the field shooting.
Here are the steps:
1. File Menu, Select Script, then select Load Layers
2. Browse to your photos location
3. Select the photos.
You can select a range by clicking on the top file, then hold down the Shift Key and select the last Photo.
Or if the photos are not in order, you can hold down the Ctrl Key while clicking on the Photos you want, this will only select the photos you click on and skip the rest.
4. Check the box: Attempt to Automatically Align Source Images. Even if you shot each photo with your camera on a tripod (You should be), there is still the chance for movement, Photoshop will now make sure all of the photos are lined up, this is very important.
5. Check the box: Create Smart Object after Loading Layers. This will save a step later on as our blending will be done with our photos converted into a Smart Object.
6. Press OK
7. Go to the Layers Menu, and select Smart Objects. Select Stack Mode and then choose Median.
I have also had success with Selecting Mean instead of Median.
If on the Ground layer there are trees, leaves, grasses etc, that because of slight movement now don't look quite right, simply go back to the first image of your stack, use it as the base ground layer, and with a simple layer mask just blend the sky (or water) from the Blended layers into your base layer. Since the base layer is one of the images you used for your stacking and blending, it will seamlessly blend in.
Also as you finish up, you will possibly see some space on the edges where the Alignment you did in the beginning did move some of the images to line them up. Just use the crop tool and crop those edges off.
And there you have it. An alternative to your 10 stop ND!