Amazing view into the world of the small. Beautiful collection of macros.
Thanks Alan.
Hand held!!! Wow, these are all great, I wish I had that skill.
Thanks Ben. As to skill, please bear in mind that for me at least getting shots that work is very hit and miss. I suspect that is generally the case for people photographing small subjects hand-held, but I'm sure some people have much steadier hands and better hand/eye coordination than mine and as a result have a higher success rate than I do. Most of the typically 400 to 600 images I capture in a one to two hour session get thrown out on a first quick run through as obviously unusable. I then have to pick through the rest and work on them to see which of them seem worth keeping.
Hey Nick! We have sure been missing your photography! These are so great. I am really envious of the detail and lighting in all of these. It’s funny, it’s like there is a whole other world right below our noses that most of us never even notice.
My favorites are #1 and 5.
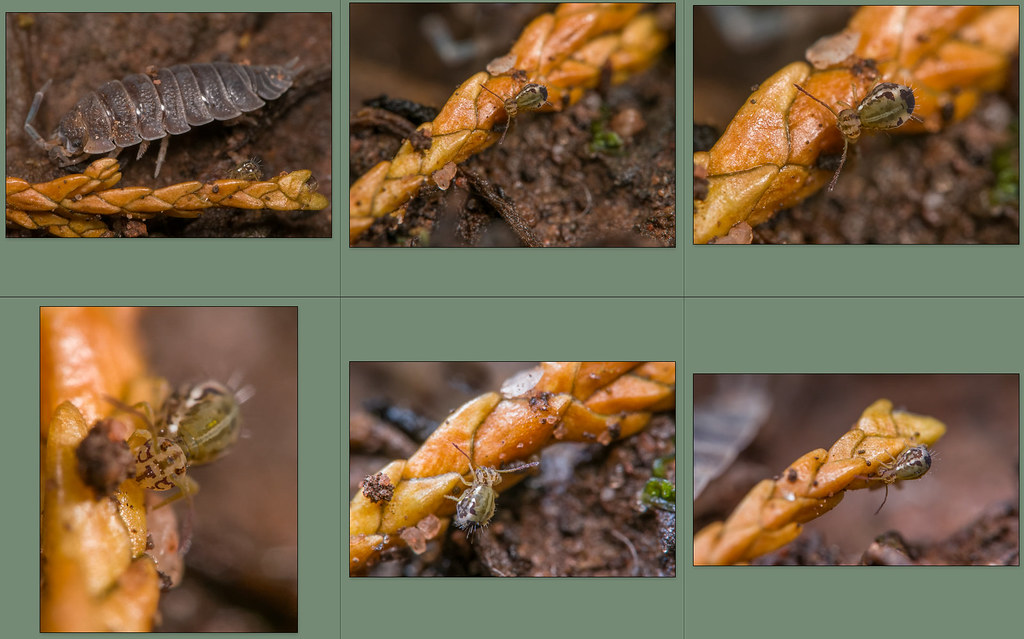
Thanks Jim. Yes, there is another world there. One of the great things about photographing small things is that, if you can find somewhere suitable, there can be quite a lot to find and try to photograph in rather small areas. I have only in the past year or so started getting decent results with subjects as small as that springtail. That has opened up another world for me. During the winter months there has been nothing to see by way of the sort of spiders, flies, bees, wasps, snails etc that you notice around you in the rest of the year. However, it turns out that there are smaller things around. It is a slower business because there aren't many of even the smaller subjects, and they are difficult to spot amongst the detritus of a similar size on the leaf litter. That's why, as with the snail hatchling at #5, I very often have to take a photo first to find out what it is than I'm looking at. Here is an example from a few days ago in our garden. I was photographing the first larger subjects that I've seen this year, in this case a non-biting midge. Notice the three rounded areas with darker centres, two at the bottom right and one on the right edge at the top. What are they?

2022 09 2022_02_27 DSC02906_PLab5 1300h DNAIcLoHi by
gardenersassistant, on Flickr
I don't know, but here is what I saw when I looked closer at something similar on another of the Choisya leaves. I'm very poor at identifying things, but I think this may be a
scale insect.

2022 07 2022_02_27 DSC02952_PLab5 1300h DNAIcLoHi by
gardenersassistant, on Flickr
The setup is pretty interesting. f/100? I don't remember every going above f/16 in anything I have ever shot.
Nice results.
Thanks Jameel.
Concerning f/100, this gets a little complicated.
For over a decade I used close-up lenses. I used them on small sensor bridge cameras and on telezoom lenses on interchangeable lens cameras, such as a 55-250 on an APS-C Canon 70D and a 45-175 on various G series Panasonic micro four thirds cameras. The common theme with these was that if I used minimum aperture I got the same depth of field. For example, minimum aperture was f/8 on the bridge cameras, f/22 on micro four thirds and f/22 to f/32 depending on focal length with the APS-C 55-250. If I photographed the same scene with any of these three setups, using the respective minimum aperture, then I would get the same depth of field in all three cases. That would be the same depth of field I would have got with a full frame camera using f/45 (although I didn't have a full frame camera at that time). This f/45 full frame equivalent aperture let me produce images like these:
f/8 on a small (1/2.3") sensor bridge camera

1836 04 1376 02 1374 13 2018_09_01 P1530201_DxO RAW SP7 LR7 1400h by
gardenersassistant, on Flickr
f/22 on micro four thirds

1834 Close-up lens example 3 08 1319 016 15 P1710921_DxO 0100RAW01cP SP7 LR6 1300h DNAI21 0 by
gardenersassistant, on Flickr
f/32 on APS-C

1834 Close-up lens example 4 7 IMG_3579_DxO SP7 LR7 1300h 2018_02_10 PP DNAI21 0 by
gardenersassistant, on Flickr
With these small apertures the images are very soft because of the large amount of diffraction, but with some careful post processing and keeping the outputs small at 1300 pixels high the image quality of images like those above was sufficient for my purposes (basically for my own enjoyment). In fact, with f/45 full frame equivalent the amount of diffraction is so large that it dominates image quality and so it didn't matter which setup I used - sensor size, lens quality, number of pixels on the sensor, none of it made any difference that I could see. So I ended up using the setup that I was most comfortable with, which was my bridge cameras.
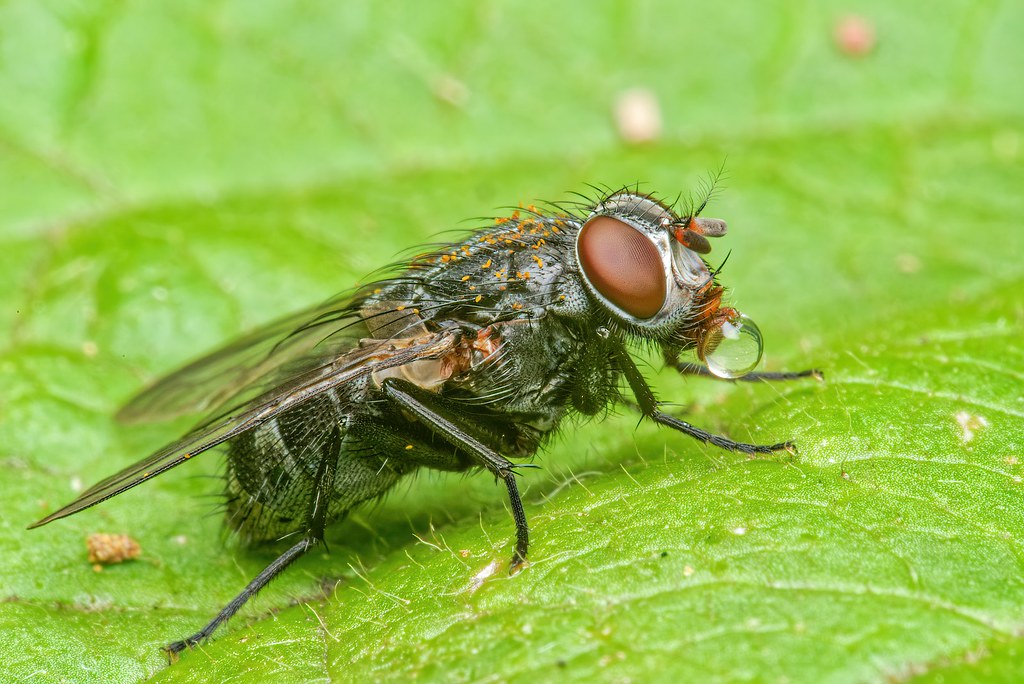
So it was until the summer before last. There were some very small flies that I wanted to photograph on our tiny (about 5 ft x 3 ft) pond. I just couldn't get a decent image of them. I tried and tried and tried, and really concentrated on it, for days. But I simply couldn't do it. For other reasons altogether I had bought a full frame camera and in desperation, and with no real hope of success, I tried that on the tiny flies, and instead of using a close-up lens I used a powerful macro lens that I had had for years but didn't get on with. To my surprise, it worked. For the first time I got a reasonably decent image of one of the tiny flies. In fact, I got a dozen or more that I thought were acceptable, or at least promising. This is the one that convinced me that this was a path worth pursuing. (Never mind the chopped off wing - it was the image quality and not the composition that mattered to me.)

1642 Reworked 2022_03_03 DSC02305_PLab5 1300h DNAIcLoHi by
gardenersassistant, on Flickr
It turned out that the key difference was that by using a macro lens I could use an aperture smaller than f/45, and so I could get greater depth of field. The way this works is that when you are using a macro lens, extension tubes, teleconverters and/or bellows (but not when using a close-up lens) the effective f-number increases as the magnification increases, roughly as per the following formula:
Effective f-number = Nominal f-number * ( 1 + magnification )
Where (as long as you aren't using certain Nikon setups) Nominal f-number is the f-number you set on the camera/lens and Effective f-number is the one you are actually using, and so is the one that determines how much depth of field you get. So for example if you are using f/11 at 5X magnification, the f-number you are actually using is f / ( 11 * ( 1 + 5 ) )= roughly f/64.
The calculations are are slightly different when using teleconverters, namely
Effective f-number = Nominal f-number * teleconversion factor * lens magnification
So for example, the teleconversion factor when I'm using a pair of 2X teleconverters is 4, so if I set my Laowa 2X to f/11, and set the Laowa to 1.5X magnification, then the effective f-number is f / ( 11 * 4 * ( 1 + 1.5 ) ) = around f/110.
In this case the overall magnification I'm using is 4 x 1.5X = 6X. I find it simpler to say that the f-number I'm using is f/45 (11 * 4) rather than explaining each time about the teleconversion factor.
Of course the price I pay for the extra depth of field is even more diffraction softening, which makes post processing (and keeping the outputs small) even more important to make the best I can of these extremely soft images.