

Kyle Jones
Moderator
Focus stacking is a commonly used technique to increase the depth of field in your images. The general idea is to take several images, each focused at a different point in the scene, and then combine the sharpest parts of each frame into a single, sharp image. The intent of this article is to show an easy way to combine the images in Photoshop. I'll only touch briefly on the process for capturing them. There are also several specialized tools for combining images - but so far I've been able to stick with Photoshop.
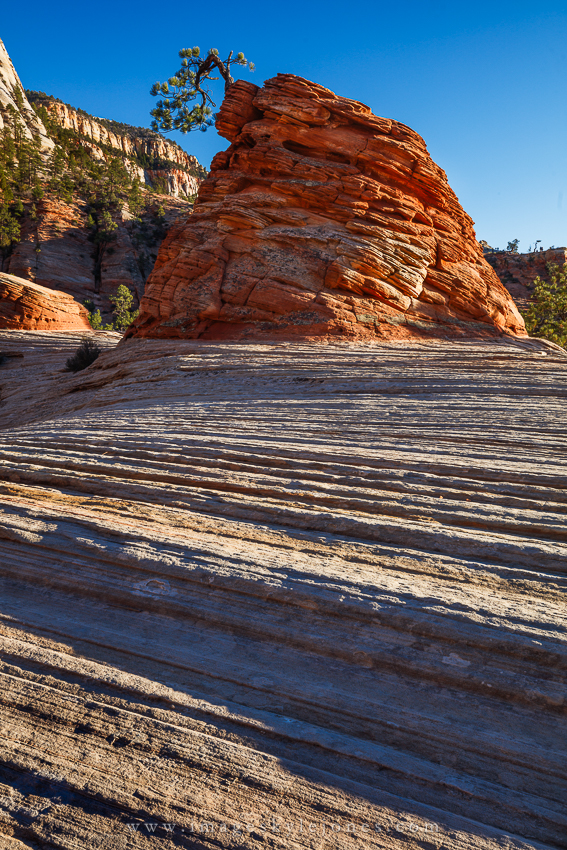
The image below, taken in Zion National Park, has a foreground that is less than a meter from the front of the camera and cliffs that are essentially at infinity. There is no way to get all of that in focus with a single shot. I tend to follow a manual process in Live View for capturing images intended for a focus stack. I usually use an aperture of f/8-f/11 since lenses tend to perform really well there and the depth of field for wide lenses is pretty good. For an image like this, I shoot from front to back. I'll select a focus point near the bottom of the scene, capture an image, move the focus point up, capture another image, and repeat until I've gotten to the farthest object in the scene. It can be helpful to consult a depth of field chart to make sure you capture enough images, especially in the region closest to the camera. If you miss a "slice", then you will have a blurry area in the final image rendering it unusable. I have made that mistake. More than once... It is important to note that focus stacking works best in an image where nothing is moving. Trying to combine plants swaying in the breeze or waves at the beach in this way can create a mess. At the very least you'll have to do some manual clean up.
I do my RAW editing in Lightroom, but the same capabilities are available in Adobe Camera RAW. After completing my RAW edits on one of the images, I copy the processing settings to the others that I want to stack. In this case I used four images for the scene. Once that is done, I select all of the images for the stack and then right click and choose Edit In ∙ Open as Layers in Photoshop. This will bring all of the images as layers in a single Photoshop file.

Here you can see the resulting layers in the Photoshop layer pallet. Just as I tend to shoot from front to back, I like to arrange my images in Photoshop from front to back as well. This doesn't (or at least shouldn't) affect anything but it helps me to keep track of what is going on. You can just drag the layers over each other to change the order.
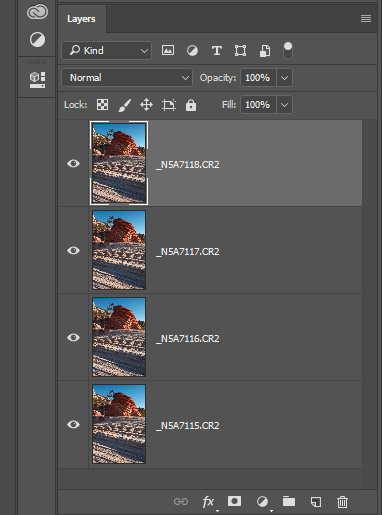
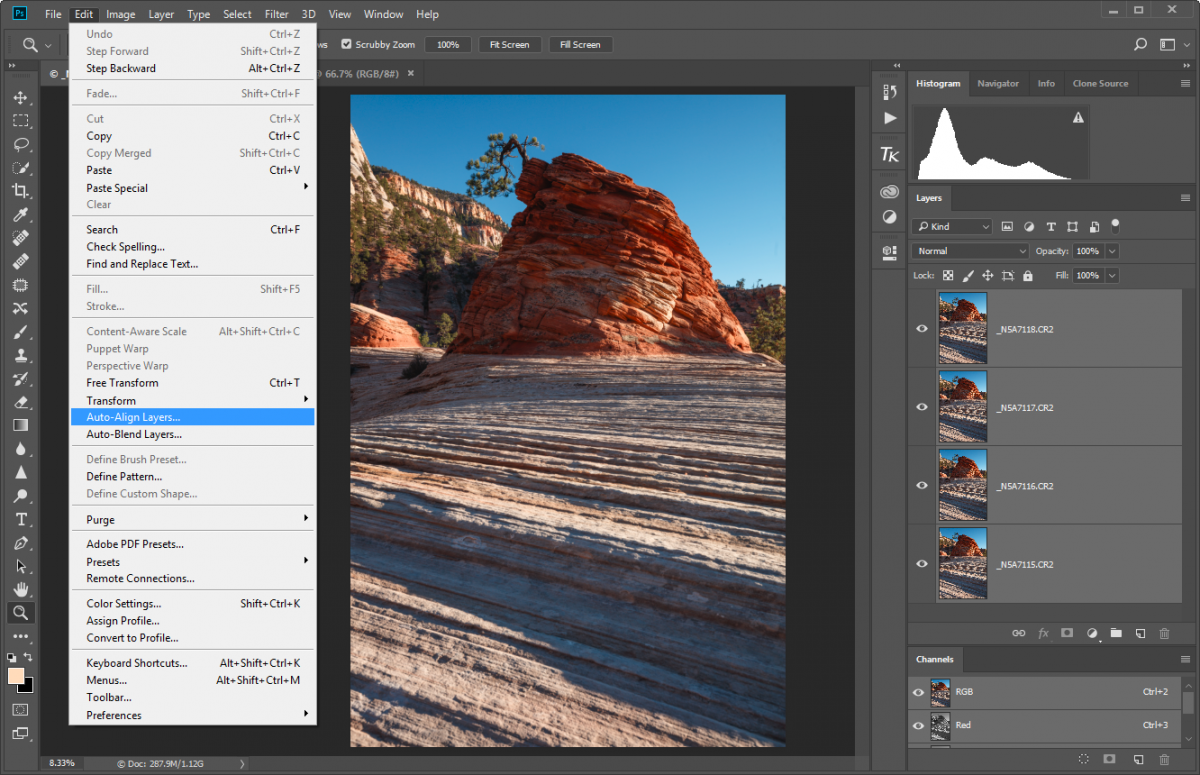
The next step is to align the images. When you change the area of focus, things in the image do shift slightly. This is commonly referred to as "focus breathing". Aligning the images helps to correct for that effect. Simply select all of the layers (as you can see in the layer pallet of the image below) and then from the menu select Edit ∙ Auto-Align Layers
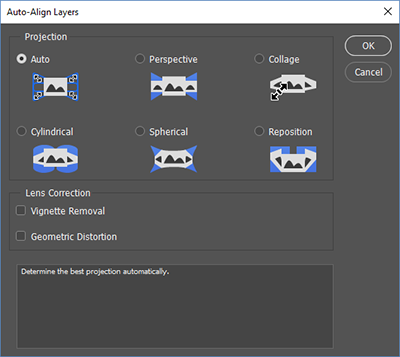
I just stick with "Auto" as shown below.
Once that completes it is time to blend the images into the focus stack. With all of the layers still selected, go to the menu and select Edit ∙ Auto-Blend Layers.

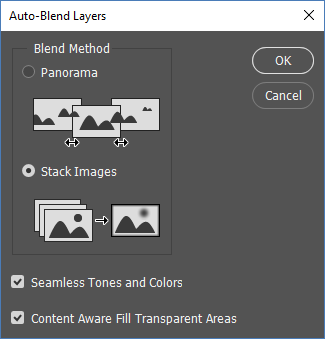
In the option box choose "Stack Images" and I usually let Photoshop create seamless tones and colors and use content aware fill for any transparent areas. If you don't like the result you can always go back and try again with different settings. Click OK when done.
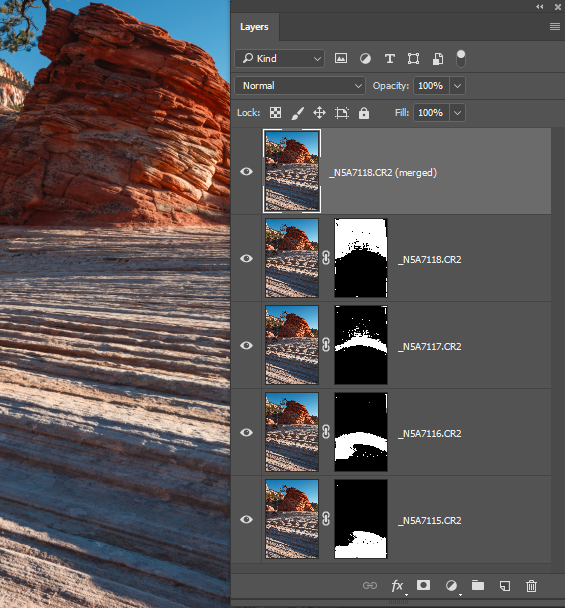
Running the auto blend may take a while, especially if you have a lot of images and a high resolution camera. When it completes you will get something like the image below. The top layer is the merged result from the stack. You can see by the layer masks what portion of each image was used to create that result.
You will likely need to crop a little around the edges of the image, since the auto-alignment step tends to create some blurry areas there. Knowing this, it is a good idea to frame your image a little wider than you want so you have room to drop a little. Look closely at the resulting image for any weird artifacts. If you see something you don't like, you can clean it up by blending in that portion from the original image that is sharpest in that area. I often clean up the nearest and farthest parts of the image in that manner.
Note that you can use focus stacking to handle some exposure blends as well. If you reduce the exposure for the sky in your last (infinity) image, the focus stacking procedure can sometimes successfully handle the exposure blend when it stacks. I usually capture my sky/infinity exposure with both the same settings as the rest of the image as well as a lower exposure. This gives me options to try auto blending the sky or manually blending it if that doesn't work well.
Good luck and happy stacking!
The image below, taken in Zion National Park, has a foreground that is less than a meter from the front of the camera and cliffs that are essentially at infinity. There is no way to get all of that in focus with a single shot. I tend to follow a manual process in Live View for capturing images intended for a focus stack. I usually use an aperture of f/8-f/11 since lenses tend to perform really well there and the depth of field for wide lenses is pretty good. For an image like this, I shoot from front to back. I'll select a focus point near the bottom of the scene, capture an image, move the focus point up, capture another image, and repeat until I've gotten to the farthest object in the scene. It can be helpful to consult a depth of field chart to make sure you capture enough images, especially in the region closest to the camera. If you miss a "slice", then you will have a blurry area in the final image rendering it unusable. I have made that mistake. More than once... It is important to note that focus stacking works best in an image where nothing is moving. Trying to combine plants swaying in the breeze or waves at the beach in this way can create a mess. At the very least you'll have to do some manual clean up.
I do my RAW editing in Lightroom, but the same capabilities are available in Adobe Camera RAW. After completing my RAW edits on one of the images, I copy the processing settings to the others that I want to stack. In this case I used four images for the scene. Once that is done, I select all of the images for the stack and then right click and choose Edit In ∙ Open as Layers in Photoshop. This will bring all of the images as layers in a single Photoshop file.
Here you can see the resulting layers in the Photoshop layer pallet. Just as I tend to shoot from front to back, I like to arrange my images in Photoshop from front to back as well. This doesn't (or at least shouldn't) affect anything but it helps me to keep track of what is going on. You can just drag the layers over each other to change the order.
The next step is to align the images. When you change the area of focus, things in the image do shift slightly. This is commonly referred to as "focus breathing". Aligning the images helps to correct for that effect. Simply select all of the layers (as you can see in the layer pallet of the image below) and then from the menu select Edit ∙ Auto-Align Layers
I just stick with "Auto" as shown below.
Once that completes it is time to blend the images into the focus stack. With all of the layers still selected, go to the menu and select Edit ∙ Auto-Blend Layers.
In the option box choose "Stack Images" and I usually let Photoshop create seamless tones and colors and use content aware fill for any transparent areas. If you don't like the result you can always go back and try again with different settings. Click OK when done.
Running the auto blend may take a while, especially if you have a lot of images and a high resolution camera. When it completes you will get something like the image below. The top layer is the merged result from the stack. You can see by the layer masks what portion of each image was used to create that result.
You will likely need to crop a little around the edges of the image, since the auto-alignment step tends to create some blurry areas there. Knowing this, it is a good idea to frame your image a little wider than you want so you have room to drop a little. Look closely at the resulting image for any weird artifacts. If you see something you don't like, you can clean it up by blending in that portion from the original image that is sharpest in that area. I often clean up the nearest and farthest parts of the image in that manner.
Note that you can use focus stacking to handle some exposure blends as well. If you reduce the exposure for the sky in your last (infinity) image, the focus stacking procedure can sometimes successfully handle the exposure blend when it stacks. I usually capture my sky/infinity exposure with both the same settings as the rest of the image as well as a lower exposure. This gives me options to try auto blending the sky or manually blending it if that doesn't work well.
Good luck and happy stacking!
Last edited:


