Milky Way 'Practice'

Mike Lewis

Staff Member
So I am still trying to get my technique and proficiency up on Nightscape images and Milky Way images in particular in preparation for my upcoming trip to Australia. I had an unfixable focusing issue with my previous lens designated for this type of shooting so I bought a different lens and this was my first real chance to check it out. I headed up to my 'neighborhood' national park (RMNP) and went up on Trail Ridge Road. I lucked out on not only the weather (which I had scouted earlier) but also with the wind, which was unusually calm compared to the forecast. Even so, I managed to forget my heavy coat and ended up pretty chilly for much of the night.

I set up before dark and took a few foreground images of my first composition and then waited until the end of astronomical twilight to start shooting, although I took some dark frames prior in case I wanted to use them. I ended up playing about with ISO (shot both 3200 and 6400) aperture (shot both wide open at f/2 and stopped down to f/2.8) and exposure length (8, 10, 15 secs). I took groups of 5 images in between the cars still going by on the road.

1) The lens isn't perfect but seems serviceable, maybe even wide open at f/2.

2) at 1:1 star trailing is visible at anything beyond about 8 secs, but at reasonable viewing sizes is maybe OK even at 15 secs.

3) With all the excellent NR routines between normal processing tools and dedicated astrophotography processing tools noise is largely not a big concern and kinda obviates the need to stack sky images. Furthermore, the stacked image I did process using Sequator had more aberrations than a single shot, so I did not keep the result.

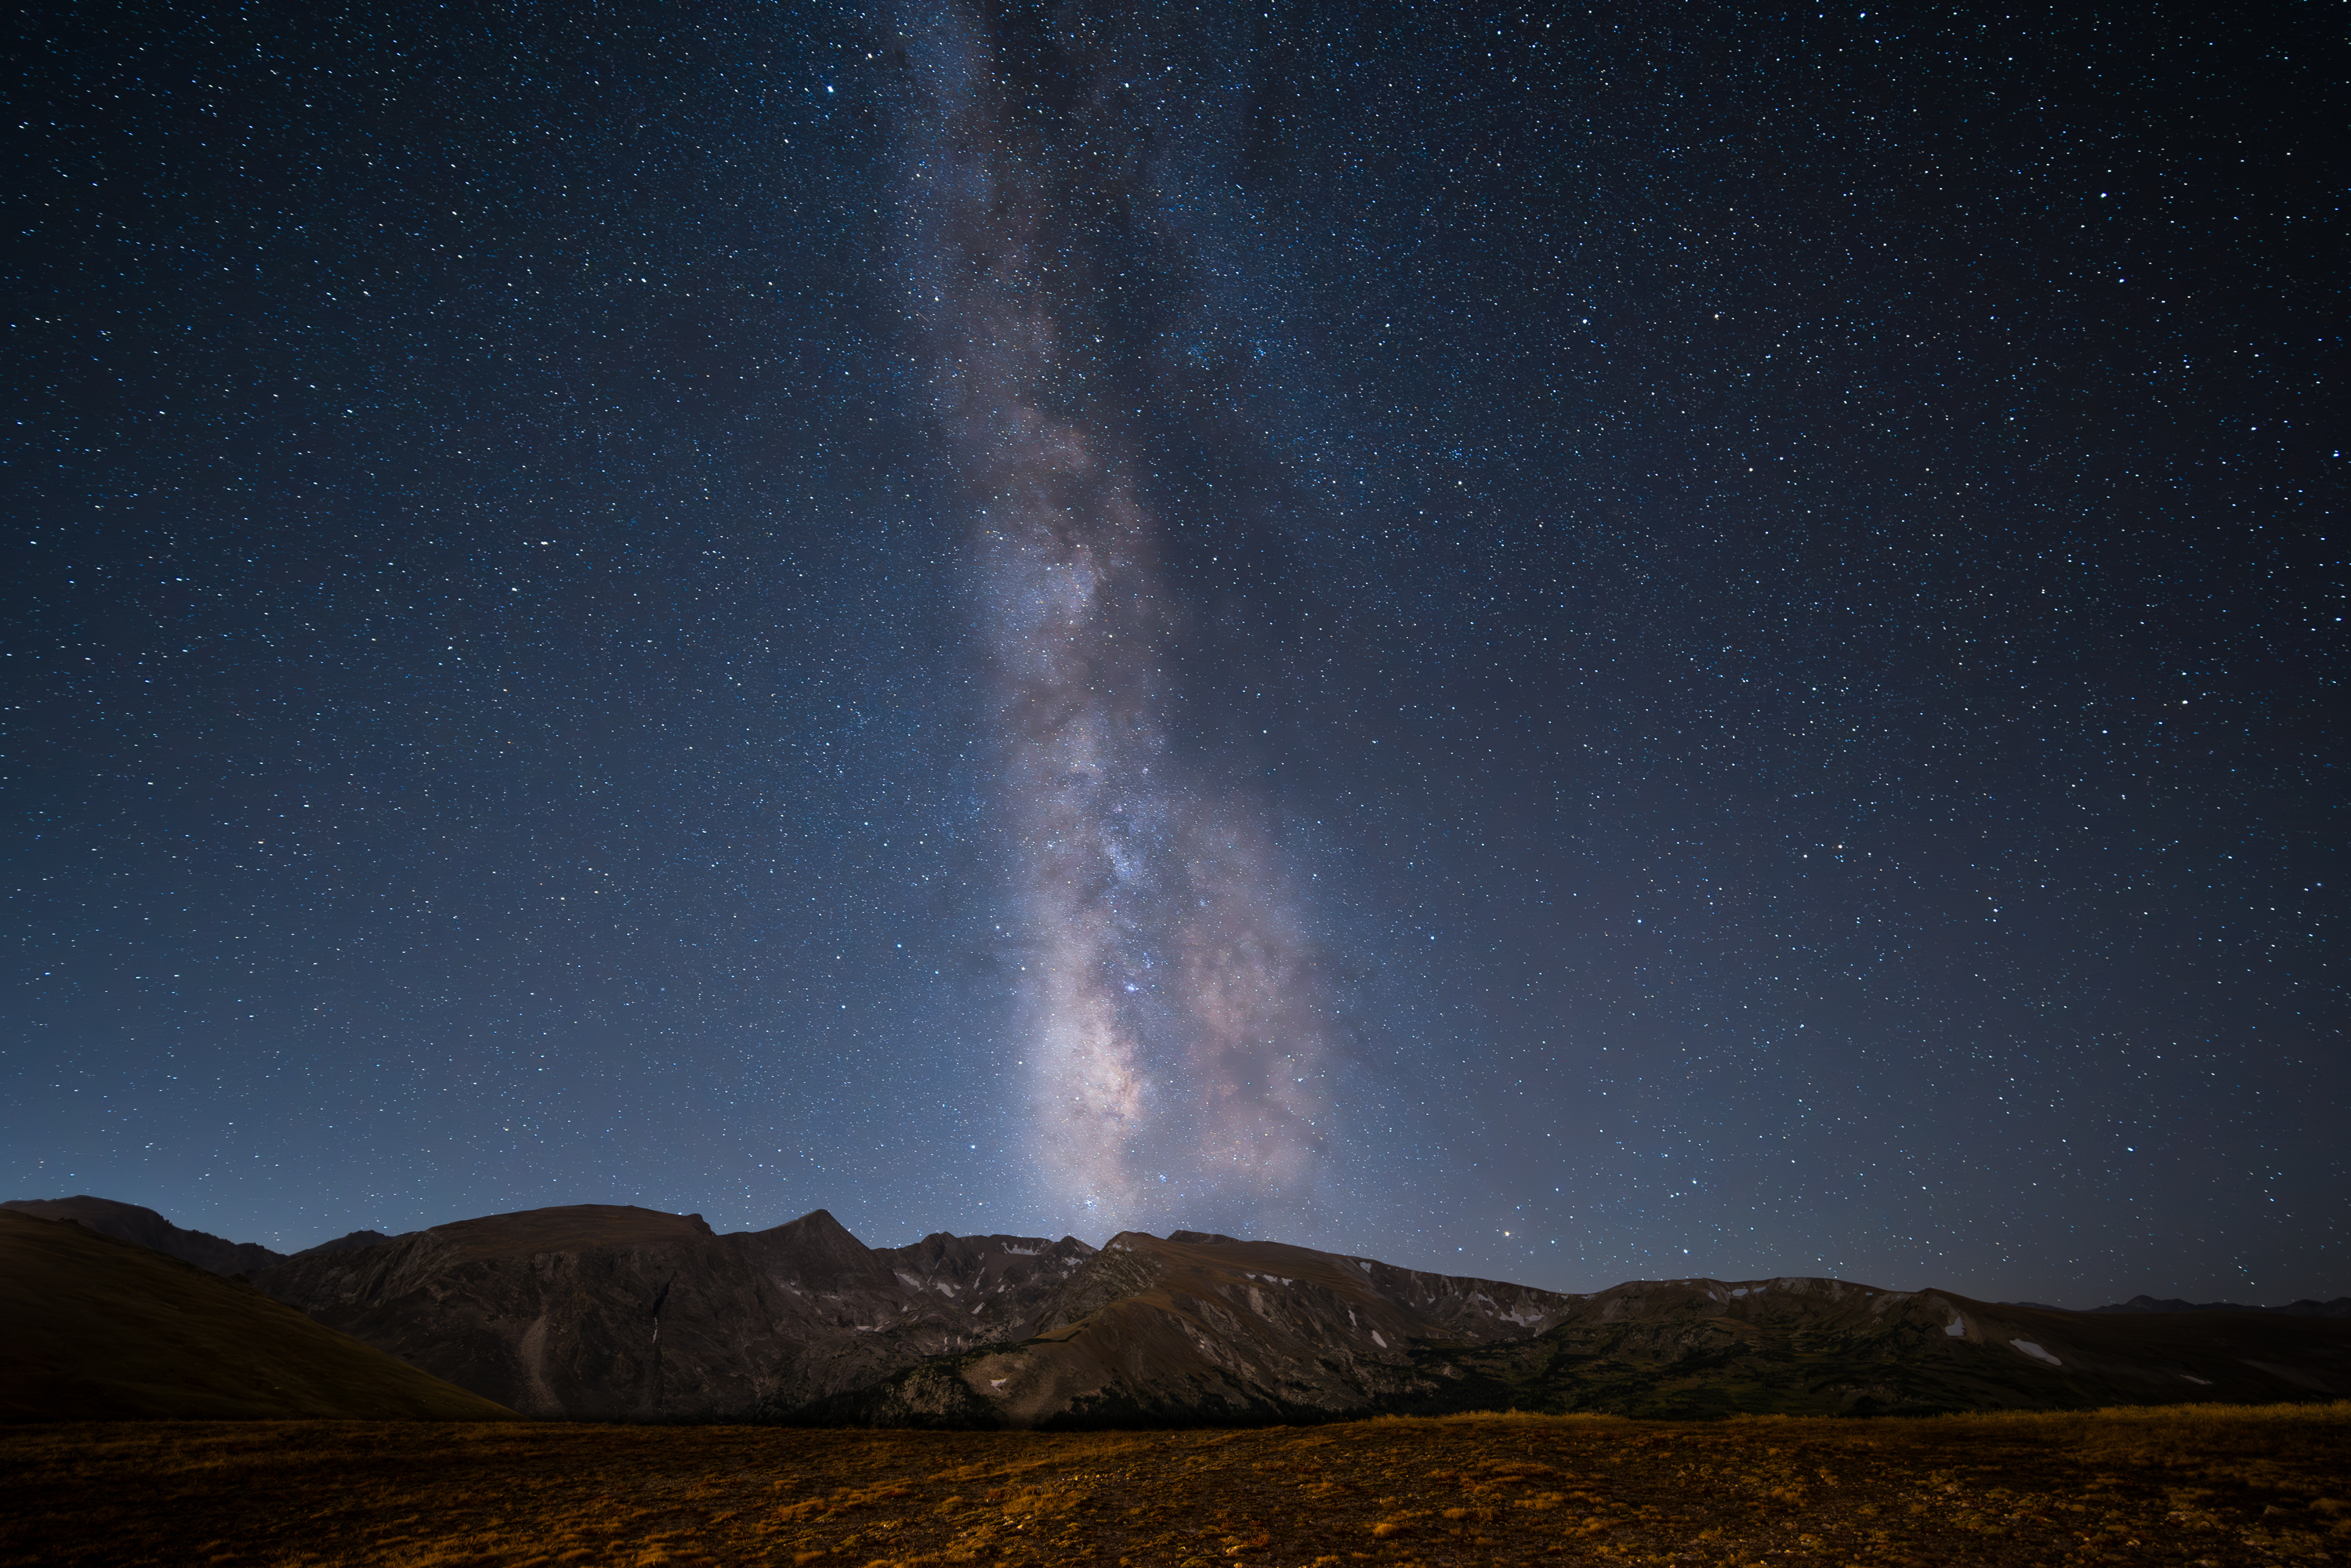
4) My first composition was not really centered on the Milky Way so even though it had a cleaner foreground image to use, I ended up using my second composition.

The Laowa 15mm f/2.0 lens used for this image does have some noticeable vignetting, which I was not able to remove to my liking in a very short attempt - I may work on that a little more, although it is not super objectionable to me as is.

So this is made from 2 images exposed as follows:
  • Sky - single frame, 15 sec @ f/2.0 and ISO 6400, NR in Lightroom (using new AI based NR)
  • Ground - Single frame, 300 secs at f/2.8 and ISO 1600, NR in Lightroom (using new AI based NR)
Since tripod was not moved between images it was easy to use the sky replacement tool in Photoshop to swap in the 15 sec image for the sky. Then edited the composite in both Lightroom and Photoshop to taste. I have lots of other frames to potentially play with if I want and lost of other development approaches I could take, but I am fairly happy with this result, which is certainly my best Milky Way effort to date and at least gives me some confidence in being able to collect the right type of data on my trip to make some decent nightscapes if the opportunity presents itself. Since I am a bit of a newbie at this however I am keen to get feedback from others more proficient at this type of photography.

LRCC_sRGB_FW_RMNP_15s_F2-0_ISO6400_sRGB_TAP15749-TAP15775-Enhanced-NR.jpg


ML
 

JimFox

Moderator
Staff member
Your capture looks pretty nice Mike. That's great that you went up there to practice. How did you find focusing with this new lens?

Some Critiques.

The Milky Way looks soft, or washed out. Could be from the Noise Reduction, or a lack of Clarity. Did you use Clarity and DeHaze in your ACR adjustments? Using those will help the details in the core and the rest of the Milky Way come out.

The Vignetting should be easy to remove using the Vignette Slider in Optics in ACR. With my Sigma 14mm f1.8, I usually have to take it all the way up to 50 to remove the Vignetting in the sky. Now that setting is too much for the ground, usually the ground only needs to be about 30. Since you are using seperate frames for the ground and sky that shouldn't be a problem.

15 sec shutter speed is just too short. At 14mm most of us will shoot between 25 and 30 secs. Of course if you pixel peep you can see some star movement. The solution is don't pixel peep. :) Pixel peeping is not needed, no one viewing this is going to pixel peep. They are just going to view it. If it's printed and in a gallery, you are supposed to view the prints from 6 feet away even. Your sky looks pretty good, so on one hand it's hard for me to say don't use 15 secs since your results are pretty good. But... why close down that amount of light if you don't have to? I would have suggested 25 secs and ISO 3200, and then check your histogram. Your histogram should be your guide. You want it to be more then 1/3rd from the left and less then half.

Regardless of my suggestions, it does look like you have a very workable Milky Way here, so that's great!
 

Mike Lewis

Staff Member
Jim,

Thanks for your input.

- I did use Dehaze and Clarity, perhaps not aggressively enough. Wondering if a LP filter might be good - does anyone make one for a camera lens? I did have to mess with the sky color a lot to get it to not be that ugly brown color...

- I hear you on the longer exposure but once I start to see trailing it largely ruins the image for me. At 15 secs it is not too visible at decent viewing size / distance but I am not sure that is still true at 25 secs. I'll give that a try next time though. The histogram was not too shabby though at 6400 and 15 secs, maybe more like 1/4 from the left or so.

- For whatever reason the vignetting correction was tricky to get to work without it giving me artifacts - I guess it did not really line up with the vignetting circle quite right. I have not played with that adjustment much, so I'll work on that some more and see if I can get a natural looking correction.

Appreciate all your guidance that is what I am looking for for sure!

ML
 

Mike Lewis

Staff Member
Pumped up the Milky Way a bit and dropped the foreground brightness a little for a slightly more natural look. Comments welcome.

Edit: tried to fix vignette and apparently overdid it. Sigh.

LRCC_sRGB_FW_V2_RMNP_15s_F2-0_ISO6400_sRGB_TAP15749-TAP15775-Enhanced-NR.jpg


ML
 

Bob

Well-Known Member
Mike,
I shoot a lot of Milky Ways. My standard conditions are 3200 iso/20 seconds with a 14mm at f1.8. These are almost identical to Jim's conditions. Your first image the stars look way to soft. Your second image is much better but still a bit too soft. I do all my editing on a MAC and us stary landscape stacker to clean the noise out of my images. As for the vignetting I crop all my images and just crop out the vignetting that usually appears in the corners. Using clarity tends to put halos around the stars so I never use clarity. I sharpen with topaz sharpening app which works really well. I use live view zoom into a star and manually sharpen the star when I am shooting the sky. Using Dehaze changes the sky to a darker blue which I do not like so I tend to avoid it or just use it very minimally. Not sure where the light blue halo around the milky way comes from but my guess it is from Dehaze.
Hope this helps.
Bob
 

JimFox

Moderator
Staff member
Hey Mike,

Your edit looks better except for the vignetting. The core of the Milky Way still has a very soft look to it. Not sure where that came from. How about posting a straight out of the camera jpg of the sky?

But I will say I like the look of the sky better overall, it's a bit darker.

Some of this is just going to be trial and error for you. Each time you edit one, you will get a better feel for how much you can push each adjustment.
 

JimFox

Moderator
Staff member
Mike,
I shoot a lot of Milky Ways. My standard conditions are 3200 iso/20 seconds with a 14mm at f1.8. These are almost identical to Jim's conditions. Your first image the stars look way to soft. Your second image is much better but still a bit too soft. I do all my editing on a MAC and us stary landscape stacker to clean the noise out of my images. As for the vignetting I crop all my images and just crop out the vignetting that usually appears in the corners. Using clarity tends to put halos around the stars so I never use clarity. I sharpen with topaz sharpening app which works really well. I use live view zoom into a star and manually sharpen the star when I am shooting the sky. Using Dehaze changes the sky to a darker blue which I do not like so I tend to avoid it or just use it very minimally. Not sure where the light blue halo around the milky way comes from but my guess it is from Dehaze.
Hope this helps.
Bob
Hey Bob,

We all probably have different experiences from our adjustments, and perhaps a lot depends on how bright or dark our night sky is captured at? But I have never seen halo's around stars from using Clarity, and I use Clarity on all of my night images. I have also never observed DeHaze causing a halo around the Milky Way. DeHaze can cause colors to go a bit wonky when pushed too much. I use both adjustments and have never noticed issues, both adjustments are great to raise the brightness of the whites (stars and Milky Way, while decreasing the blacks (background) pretty naturally.
 

Bob

Well-Known Member
Hey Bob,

We all probably have different experiences from our adjustments, and perhaps a lot depends on how bright or dark our night sky is captured at? But I have never seen halo's around stars from using Clarity, and I use Clarity on all of my night images. I have also never observed DeHaze causing a halo around the Milky Way. DeHaze can cause colors to go a bit wonky when pushed too much. I use both adjustments and have never noticed issues, both adjustments are great to raise the brightness of the whites (stars and Milky Way, while decreasing the blacks (background) pretty naturally.
Jim,
I really didn't say the Dehazed caused the light blue halo around the Milky Way I was just speculating. I really was not sure where the lighter blue came from. I also use Dehaze but very very slight because it does add blueish tint. In the older versions of photoshop clarity definitely casued halos around the stars but maybe they fixed it in the newer versions. However, I stop using clarity because of that and never went back to using it. I may go back and try it again if you say it works without halos. When I process my Milky Way images I usually check the image at 100% zoom to check out "trails" and "vignetting"and "sharpness", I was just sharing my processing experience. Clearly, Mike is using a PC not a MAC. I only use Mac and that is the way I process my images just so Mike sees a different point of view. Didn't expect the way I process to be the best or the worst just another way.
Bob
 

JimFox

Moderator
Staff member
Jim,
I really didn't say the Dehazed caused the light blue halo around the Milky Way I was just speculating. I really was not sure where the lighter blue came from. I also use Dehaze but very very slight because it does add blueish tint. In the older versions of photoshop clarity definitely casued halos around the stars but maybe they fixed it in the newer versions. However, I stop using clarity because of that and never went back to using it. I may go back and try it again if you say it works without halos. When I process my Milky Way images I usually check the image at 100% zoom to check out "trails" and "vignetting"and "sharpness", I was just sharing my processing experience. Clearly, Mike is using a PC not a MAC. I only use Mac and that is the way I process my images just so Mike sees a different point of view. Didn't expect the way I process to be the best or the worst just another way.
Bob
Hey Bob,

When Mike posted this I had hoped you would chime in as you put out some really great Milky Way photos. Since I do use Clarity and Dehaze in my workflow, I simply wanted to let Mike know I haven't had any ill effects from it. And the one ill effect that can come from DeHaze, the causing the sky to turn blue actuall can work in one's favor since we typically cool down the White Balance on our Milky Way images.

Thanks!
 
  • Like
Reactions: Bob

JimFox

Moderator
Staff member
@BlackRockArt Hey Oliver? You have any helpful suggestions for Mike? You also are really adept with your Milky Way images. I know you are on the road, but if you can give Mike some suggestions when you get back, that would be awesome.
 
@BlackRockArt Hey Oliver? You have any helpful suggestions for Mike? You also are really adept with your Milky Way images. I know you are on the road, but if you can give Mike some suggestions when you get back, that would be awesome.
Hi Jim.

I have looked at @Mike Lewis ' Milkyway photo last night, there is something off. I don't know if I should be brutally honest or surgically precise in my critique, but I will be back home tomorrow night.

@Mike Lewis Hi Mike, what lens did you take the photo with ? I am trying to guess where the problem could be.

Oliver
 

Mike Lewis

Staff Member
Wow, lotsa of good info and traffic on this post from the people who know how it is done. Very cool.

I am about to head out for a very short trip so cannot post much right now but will be back to add to the discussion. I did run this through a number of the astrophotography processing tools and got another version, perhaps over-processed? You decide and thanks for the continued feedback. I will be sure to post the single frame raw image I used for the sky on this image with no other edits when I get back in a couple days...

LRCC_sRGB_FW_RMNP_15s_F2-0_ISO6400_sRGB_TAP15749-TAP15775-Enhanced-NR_VC1_Clean_Game-gm_CT_BBS...jpg


ML
 
Hi Mike

I just got time to sit down and look at the photos in detail on the computer; here are my two pennies:

1) I think your original RAW file is fine, the image was well captured.

2) The blending composition is nicely done.

Where it goes haywire, IMHO, is the Noise reduction in Camera RAW or Lightroom.

The AI Noise reduction algorithm works fine with portrait, low res, daytime photos, and cellphone photos; when it comes to wide field astro night photography, it gets confused and smears too many details. I have tried the AI NR many times but could never get satisfactory results.

Also, the Milkyway part is too bright against the night sky, maybe you can increase the feathering in the radial mask to make a more gradual tone change?

Anyway, the milkway is gorgeous.

Oliver

PS: here is my output at Big Sur coast.

_B4C9080FullsizePigeonPoint45FB.jpg


_B4C8965FilledNightSkyFBNoStar.jpg
 

Mike Lewis

Staff Member
Oliver,

Great info - thanks. I plan to reprocess with
Hi Mike

I just got time to sit down and look at the photos in detail on the computer; here are my two pennies:

1) I think your original RAW file is fine, the image was well captured.

2) The blending composition is nicely done.

Where it goes haywire, IMHO, is the Noise reduction in Camera RAW or Lightroom.

The AI Noise reduction algorithm works fine with portrait, low res, daytime photos, and cellphone photos; when it comes to wide field astro night photography, it gets confused and smears too many details. I have tried the AI NR many times but could never get satisfactory results.

Also, the Milkyway part is too bright against the night sky, maybe you can increase the feathering in the radial mask to make a more gradual tone change?

Anyway, the milkway is gorgeous.

Oliver

PS: here is my output at Big Sur coast.

View attachment 65189

View attachment 65190

Oliver,

Trying again now that I am home and have reliable internet.

I do plan to reprocess with a wonderful astrophotography based noise reduction process that really knows how to reduce noise without affecting stars. I will perform that on the image used for the stars and before I do the blend with the image used for the foreground. It will be interesting to see how that looks.

As for the Milky Way being too bright, I think I just ended up overdoing the Milky Way processing as I stepped through these next versions. I appreciate your feedback and it is very instructive to see your wonderfully executed examples both of which are spectacular.

ML
 

Mike Lewis

Staff Member
Here is the single image used for the stars portion of the composite, which was requested by one of the folks nice enough to give me feedback.

LRCC_sRGB_FW_TAP15749.jpg


You can see what I started with. One of the biggest issues is the sky color (since this is shot raw I was able to tweak the color balance a bit cooler and at least help the look of the sky color, although I then have quite a few blue stars. Also you can see the vignetting at f/2.0 - seems like it should be an easy fix but I have just not been able to get Lightroom's tools (which I think are identical to those in Photoshop ACR) to handle it in a way that looks natural.

ML
 

JimFox

Moderator
Staff member
Hey Mike,

As there has been talk about noise in the sky, I will mention that I don't use any noise reduction in the sky. If you use a longer shutter speed, and drop your ISO to 3200 or below. At f2.0 you should be able to use ISO 2000.

This raw image is totally normal for a night time image, you have great detail in the Milky Way, the vignetting looks totally normal too, along with the White Balance.

Correcting the WB is pretty easy, in ACR, take the WB down to about 4000 to start, take it to the point the background sky starts to look blue. But watch to make sure the stars and Milky Way stay white and don't turn Blue, if they turn blue you went to far. Then increase the Tint up to where the blue turns a nice deep blue. It just takes a bit of practice, as it is a bit of sliding around.

I do want to say, this image looks perfect for a raw Milky Way. So that tells me you have down how to capture your Milky Way, now it's simply working on the processing and getting yourself a workflow that works.

If you do decide to keep using such a high ISO, the other thing you can do to reduce the noise is take 8 or 10 images, and then stack them. That will reduce the noise too.

Ben had a routine set up to be able to create a dng file that was a bit reduced in resolution, but it was small enough to be able to upload. It was in his Let's Play weekly post. That might be something you could do too, where then a few of us could edit it, show our steps and final result.
 
Top Bottom