Mike Lewis
Staff Member
So in case any members are feeling the pull of the astrophotography bug, I thought I might try to cover a few introductory topics, as astrophotography is a very enjoyable sub-hobby of photography, but it also has a learning curve and a large potential to end up frustrated if you spend your money on gear that is not appropriate for the type of images you want to be able to create.
This brings us to the most important initial consideration – what type of images you wish to take, which has everything to do with the type and quality of equipment you need to get. Unlike the classic statement about terrestrial photography, where it is stated the photographer is more important than the type of camera, in astrophotography, there is no getting away from the fact that certain type of images require certain types of gear. For instance, you will not be able to take the type of multi-minute long tracked subframes required to capture most if not all deep sky objects without some way to automatically move the camera sensor at the same rate as the earth’s rotation. But deep sky targets are only one type of astrophotography image you can go after:
From a target perspective, these break down as follows:
1) Untracked fixed tripod images of the sky possibly also including some terrestrial foreground. If you have a DSLR and a fixed tripod, you are already all set to image these type of objects. Generally shorter exposures or wider FOV lenses are used to try to minimize the motion of the stars in the captured image, although, a special version of this type of imaging accentuates the star motion by creating star trails across the sky.
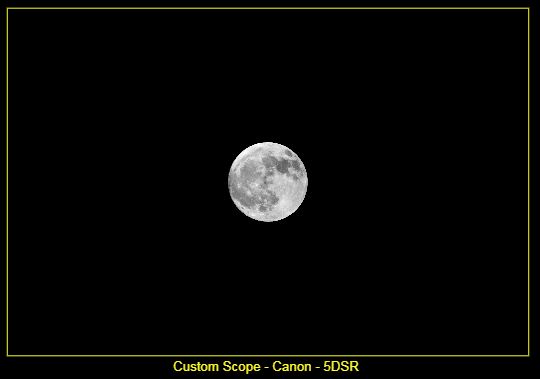
2) Untracked fixed tripod images of Solar System Objects. These objects are very bright (as anyone who has placed the moon in a dusk or nighttime composition and expected to get good foreground AND moon detail knows) and therefor can easily be imaged without any tracking ability. In fact, state of the art Solar System imaging is typically done by shooting video, and then post processing the video to extract only the frames that are least affected by atmospheric turbulence (called seeing), and then aligning and stacking those to get a final result. Generally speaking, much better results can be achieved this way than by shooting a single still frame, unless you are located somewhere with exceptional seeing. The trick for this type of imaging is focal length, as even a 600mm optic produces a relatively small moon image on a full frame sensor, and of course all the other objects (besides the Sun) are much smaller than the moon.
Apparent Size of Moon, 600mm FL, FF DSLR:
3) Tracked wide-field images using camera lenses or small telescopes. This is an exploding section of the hobby, with many new, small, and affordable trackers that can be used with your existing kit (DSLR, fixed tripod, ballhead) to take longer exposure tracked images of sections of the Milky Way or some of the larger and brighter deep sky objects. The tracking on these devices is crude compared to full sized equatorial mounts, and the weight capacity is limited, but with a certain amount of care and feeding, really fun results can be achieved. All of these devices are NOT created equal though, so it pays to do some research and read lots of user reviews to see which unit(s) might match your needs. And it is also good to be realistic on capabilities – if you want to shoot with up to maybe a 200mm focal length using your DSLR you can (with careful pointing and alignment) get some decent results. But do not expect to put a large telephoto or actual telescope on one of these type units, unless you are talking about the very expensive (> $1,000) designs that are now starting to appear.
4) Tracked and guided deep sky astroimaging using larger optics (dedicated telescopes), expensive equatorial 2 axis tracking mounts, and also possibly dedicated astro cameras. If you catch the astroimaging bug as seriously as I did this is where you could be destined to end up. There is still a broad range of gear up at this level, but once again, the performance and quality control of the cheaper stuff makes using it a science fair project, and it is quite typical to spend most if not all of an expected imaging session fighting with your gear to make it perform adequately. That is why most folks are better off to move up to this level in stages, starting off with untracked imaging or a much less expensive simple tracker.
So really the biggest advice then is, read a lot and investigate before you buy anything. Along those lines, I will close with a couple of good reference links:
· www.astropix.com – Jerry’s site is a wealth of astroimaging info, mostly centered on using your existing DSLR. He has some very excellent free tutorials, as well as comprehensive books on CD on the subject that are absolutely some of the best money you will spend in the hobby. I do not get any kickbacks from him, but I always recommend these CDs as a great starting point, to answer many questions on what you should buy (and more importantly, NOT buy) especially when starting out. An expenditure of $39.95 on one of these could save you hundreds or even thousands mis-spent later on gear that will not work the way you want it to.
· Want to figure out how big that object will be in your camera and lens or telescope combo? Go to https://astronomy.tools/calculators/field_of_view/ and fill in the fields (lenses are considered a custom scope) and you can get instant feedback on how something will be framed. The moon at 600mm in a full frame DSLR image shown above came from this site.
· Want to see the best that amateur astrophotography has to offer? Go check out www.astrobin.com – this site is populated by amateurs like me (many MUCH more accomplished than me!) and there are images of almost anything in the sky. Under the Explore menu check out the top picks or image of the day to see the very best stuff out there. You can also do extensive searches to see what type of images have been taken using a particular camera, telescope, lens, or tracking mount.
Well that’s just scratching the surface of this hobby for sure. Hope this might be helpful though to any folks out there starting to want to point their camera up into the night sky and see what they might capture!
ML
This brings us to the most important initial consideration – what type of images you wish to take, which has everything to do with the type and quality of equipment you need to get. Unlike the classic statement about terrestrial photography, where it is stated the photographer is more important than the type of camera, in astrophotography, there is no getting away from the fact that certain type of images require certain types of gear. For instance, you will not be able to take the type of multi-minute long tracked subframes required to capture most if not all deep sky objects without some way to automatically move the camera sensor at the same rate as the earth’s rotation. But deep sky targets are only one type of astrophotography image you can go after:
From a target perspective, these break down as follows:
1) Untracked fixed tripod images of the sky possibly also including some terrestrial foreground. If you have a DSLR and a fixed tripod, you are already all set to image these type of objects. Generally shorter exposures or wider FOV lenses are used to try to minimize the motion of the stars in the captured image, although, a special version of this type of imaging accentuates the star motion by creating star trails across the sky.
2) Untracked fixed tripod images of Solar System Objects. These objects are very bright (as anyone who has placed the moon in a dusk or nighttime composition and expected to get good foreground AND moon detail knows) and therefor can easily be imaged without any tracking ability. In fact, state of the art Solar System imaging is typically done by shooting video, and then post processing the video to extract only the frames that are least affected by atmospheric turbulence (called seeing), and then aligning and stacking those to get a final result. Generally speaking, much better results can be achieved this way than by shooting a single still frame, unless you are located somewhere with exceptional seeing. The trick for this type of imaging is focal length, as even a 600mm optic produces a relatively small moon image on a full frame sensor, and of course all the other objects (besides the Sun) are much smaller than the moon.
Apparent Size of Moon, 600mm FL, FF DSLR:
3) Tracked wide-field images using camera lenses or small telescopes. This is an exploding section of the hobby, with many new, small, and affordable trackers that can be used with your existing kit (DSLR, fixed tripod, ballhead) to take longer exposure tracked images of sections of the Milky Way or some of the larger and brighter deep sky objects. The tracking on these devices is crude compared to full sized equatorial mounts, and the weight capacity is limited, but with a certain amount of care and feeding, really fun results can be achieved. All of these devices are NOT created equal though, so it pays to do some research and read lots of user reviews to see which unit(s) might match your needs. And it is also good to be realistic on capabilities – if you want to shoot with up to maybe a 200mm focal length using your DSLR you can (with careful pointing and alignment) get some decent results. But do not expect to put a large telephoto or actual telescope on one of these type units, unless you are talking about the very expensive (> $1,000) designs that are now starting to appear.
4) Tracked and guided deep sky astroimaging using larger optics (dedicated telescopes), expensive equatorial 2 axis tracking mounts, and also possibly dedicated astro cameras. If you catch the astroimaging bug as seriously as I did this is where you could be destined to end up. There is still a broad range of gear up at this level, but once again, the performance and quality control of the cheaper stuff makes using it a science fair project, and it is quite typical to spend most if not all of an expected imaging session fighting with your gear to make it perform adequately. That is why most folks are better off to move up to this level in stages, starting off with untracked imaging or a much less expensive simple tracker.
So really the biggest advice then is, read a lot and investigate before you buy anything. Along those lines, I will close with a couple of good reference links:
· www.astropix.com – Jerry’s site is a wealth of astroimaging info, mostly centered on using your existing DSLR. He has some very excellent free tutorials, as well as comprehensive books on CD on the subject that are absolutely some of the best money you will spend in the hobby. I do not get any kickbacks from him, but I always recommend these CDs as a great starting point, to answer many questions on what you should buy (and more importantly, NOT buy) especially when starting out. An expenditure of $39.95 on one of these could save you hundreds or even thousands mis-spent later on gear that will not work the way you want it to.
· Want to figure out how big that object will be in your camera and lens or telescope combo? Go to https://astronomy.tools/calculators/field_of_view/ and fill in the fields (lenses are considered a custom scope) and you can get instant feedback on how something will be framed. The moon at 600mm in a full frame DSLR image shown above came from this site.
· Want to see the best that amateur astrophotography has to offer? Go check out www.astrobin.com – this site is populated by amateurs like me (many MUCH more accomplished than me!) and there are images of almost anything in the sky. Under the Explore menu check out the top picks or image of the day to see the very best stuff out there. You can also do extensive searches to see what type of images have been taken using a particular camera, telescope, lens, or tracking mount.
Well that’s just scratching the surface of this hobby for sure. Hope this might be helpful though to any folks out there starting to want to point their camera up into the night sky and see what they might capture!
ML
")